Friday, March 2, 2012
Tuesday, February 7, 2012
A Matter of Change!
Physical and chemical changes happen all the time in the world. The labs which were done last week revolved around similar concepts. Basically, the ideas of physical changes and chemical changes were experienced and fully understood through the exposure to these labs. Since the class was learning about states of matter and the correlations between them, these concepts really helped us understand how matter is altered through specific changes.
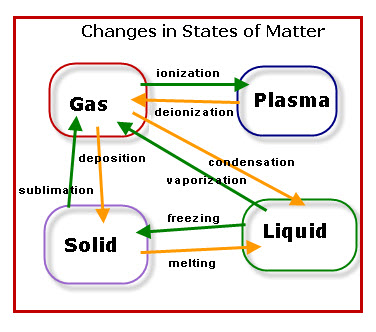
To start off with, a physical change is a change of the appearance of a substance, where the identity of the substance does not change. On the other hand, a chemical change is the result of a substance being changed into one or more new substances.

In a similar lab, a lighted candle was met with carbon dioxide. The carbon dioxide was composed of the mixture of baking soda and vinegar. Carbon dioxide is a gas. Gas is a phase of matter that does not have a definite shape or volume. The flame of the candle blew out because the presence of the carbon dioxide caused the fire to have no oxygen. This was evident as a chemical change because the fire substance was altered and in fact, it vanished. The knowledge of carbon dioxide can be used in daily life situtations. In the future, if you have problems with fires, you can always put them out by exposing them to carbon dioxide.
In the third lab, we roasted marshmallows for our amusement. In the process of roasting marshmallows, the class discovered a chemical change. Marshmallows were held above a bunsen burner and soon the marshmallow started to burn. The white and solid substance of the marshmallow turned into a burnt and gooey substance. The marshmallow was gooey because it was near a hot fire and its composition melted in some ways. Most importantly, the marshmallow was burnt and the process of combustion is known to be a chemical change. In this lab, the chemical makeup of the marshmallow changed drastically. For another part of this lab, a physical change was identified. The original marshmallow was split into half but no chemical makeup was changed. As a matter of fact, only the appearance of the marshmallow changed. By the way, the marshmallow was known to be a solid only because it had a definite shape and definite volume. The particles inside the marshmallow were closely packed together which made it a solid.
In another lab, the purpose was to burn sugar and identify changes. When the sugar substance was heated on the bunsen burner, the white of the sugar became a burnt and black color. Combustion was evident and I immediately knew that it was a chemical change. The original composition of the sugar was changed into a burnt mixture. The burnt mixture had a bit of yellow in it too. Also, since water was combined with sugar when the substance was heated, the water evaporated. Basically, a liquid turned into a gas. In other words, the water changed into water vapor. A liquid is a state of matter which is known to have a definite volume, but no definite shape. Knowledge of evaporation can help people understand how water vapor forms in the future.


Therefore, in all four labs, physical changes and chemical changes were experienced. Some changes included melting, combustion, and evaporation. Also, the key points of these labs can be helpful in understanding situations in the future. For instance, the melting of a substance is a major physical change. When you are cutting a birthday cake in the future, you should make sure to blow out your candle soon enough so it doesn't melt into your cake. Also, combustion definitely changes the chemical make up of an object. Burning has to do with fire and when fire encounters an object it is likely to burn the object. The fire will also create a chemical build up, changing the object's composition. In daily life, you should be aware that fire could change the internal and external make up of anything it catches onto. For example, when you are making a campfire, fire burns the wood. The chemical change is that the wood could turn to ash. A final example of a change in matter is with an ice cube. In the future, an ice cube could physically change to water through the process of melting.
Some citations:
http://scienceprojectideasforkids.com/2009/states-of-matterenthalpy/
http://boomeria.org/chemtextbook/cch15.html
http://www.clker.com/clipart-10942.html
http://www.google.com/imgres?um=1&hl=en&sa=N&rls=com.microsoft:en-us:IE-SearchBox&rlz=1I7GFRE_enUS323&biw=1280&bih=589&tbm=isch&tbnid=gijMmM3dS_DJnM:&imgrefurl=http://www.ehow.com/how_6387744_select-size-fire-extinguisher.html&docid=RgP_qtoJknXw1M&imgurl=http://img.ehowcdn.com/article-page-main/ehow/images/a06/2u/10/select-size-fire-extinguisher-800x800.jpg&w=225&h=220&ei=StAxT4LjM4W30AGalIXZBw&zoom=1&iact=hc&vpx=1047&vpy=111&dur=281&hovh=176&hovw=180&tx=129&ty=99&sig=110484513554308946296&page=1&tbnh=109&tbnw=110&start=0&ndsp=26&ved=1t:429,r:17,s:0
Monday, January 9, 2012
Science Lab Procedure
Science Lab Procedure
1. Carefully, pick out the transparent stone from the cup with your fingers and place it on the given tray. This stone is the solid object with the biggest mass compared to the other smaller solid objects, so it will be easy to identify. Also, this is a heterogeneous mixture so you can easily see this material.
2. Simply, pull out the three toothpicks (one red toothpick, two yellow toothpicks) from the cup and separate from the other materials in the lab. All the toothpicks fall under one category.
3. Using the given spoon, scoop out the pebbles from the mixture in the cup and put them aside from the rest of the substances.
4. Poor everything from the cup into the beaker. This includes every part in the remaining mixture.
5. Using the magnet, attract the iron filings which look like black powder. The iron particles will stick to the magnet and you can put the substance away from the other substances. You can gather the iron filings by slowly hovering the magnet against the glass of the beaker.
6. With the homogeneous mixture in the beaker, separate sand with the salt/water mixture. In order to do this, first place the given funnel over the beaker and a paper filter on top of the funnel.
7. To complete the goal of separating sand from the salt/water mixture, gently poor the solution from the beaker onto the paper filter. Since the water and salt are mixed together as one, the mixture can pass through the paper filter. The purpose of the paper filter is to just allow the water mixture to pass through. The water/salt mixture will then flow through the funnel and back into the beaker. On the other hand, the sand doesn't have the ability to pass through the filter paper so it will stay on the top surface of the paper.
8. Place the filter paper with the sand aside on the tray.
9. Now that the only remaining duty for separation is to separate the water from the salt, place the beaker of the salt/water mixture on top of the hot plate.
10. Turn on the hot plate by plugging the hot plate wire into the closest outlet. The hot plate will take time to heat up so be patient.
11. Observe as the heating mechanism forces the water to be evaporated from the mixture. The result of this is the water will disappear from the mixture. Therefore, the salt is left alone and the water is in the air, separate from the other substances.
12. Identify that you have discovered and separated seven substances successfully. Congratulations!
13. Clean up all the materials given in the lab. This includes disposing the correct materials based on the teacher's directions, washing the beaker, plugging out the hot plate, and placing all the assigned materials on the tray neatly.
Sunday, January 1, 2012
Extra Credit! - Due Jan 7th
Respond to the following quote:
"Education is the key to unlock the golden door of freedom."
"Education is the key to unlock the golden door of freedom."
By educating one, he/she is free to reach closer towards a goal. For example, a goal could be executing a high-profile job. A person should be qualified with a certain level of education to earn them a good job. Basically, education is the process of learning new things and developing skills. These skills enable a wider and more open range of opportunities. In my opinion, the more educated you are, the freer you can be in life. With a good education, you can open doors to a variety of venues and you can think in all directions. If one solution doesn't work, you are free to move to other ideas and this will give you a good lifestyle. Also, this enables for you to earn enough for a living and to make a difference in other people's lives too. By thinking big and helping others, you are earning a good placement in life. On the other hand, many people with a high level of education are well-respected by others. This gives you freedom to associate with more people around the world. Therefore, education definitely plays a big role in the journey to every aspect of freedom.
Saturday, December 17, 2011
A Fascinating Dissection of A Frog
WOW!!!!! The dissection process which was experienced in Science class on the days of Tuesday, December 13 and Wednesday, December 14 can be described in two ways:
Tuesday, December 13,2011:
Day 1 - THE DISSECTION - Students gathered in multiple groups to examine and dissect an individual frog designated to each group.To start off with, each frog was placed on a dissecting pan to prepare for the dissection. The beginning portion of the dissection involved cutting through the skin of the frog in order to get a clear view of important body parts of the organism.Once skin was pinned down to the pan, muscle appeared, but to many groups, it just looked like more skin. Once the first few incisions were made, body parts of the frog's digestive system were visible. This included the stomach, three-part liver, small intestine, large intestine, pancreas, and gallbladder. When the groups saw those gallbladders, they observed that they looked like "deflated peas." This added lots of humor to the lab.


http://frog.edschool.virginia.edu/Frog2/Dissection/Setup/setup1.html
A Frog Dissection Game:AWESOME!!!! - http://www.surgery-games.org/43/Dissect-a-Frog.html
Fascinating Connections
- A Learning Experience

During this two day lab, students were given an oppurtunity to dissect the dead body of a frog. These frogs which were dissected in the class were one of the many species of frogs and they maintained a green color. For diversity, both male frogs and female frogs were dissected. Now, the purpose of this lab was not to open the body parts of the frog for the sake of it, but to understand how organisms share similar connections throughout the body. They did indeed share similar body parts with the body of the human.
Source to Picture #1(above)(right): http://www.scientificillustrator.com/illustration/amphibians/leopard_frog.html
The picture above is to represent a typical frog. NOTICE: The page cited shows information about a certain frog species which does not serve any purpose to the main idea of the frog dissection.
Day 1 - THE DISSECTION - Students gathered in multiple groups to examine and dissect an individual frog designated to each group.To start off with, each frog was placed on a dissecting pan to prepare for the dissection. The beginning portion of the dissection involved cutting through the skin of the frog in order to get a clear view of important body parts of the organism.Once skin was pinned down to the pan, muscle appeared, but to many groups, it just looked like more skin. Once the first few incisions were made, body parts of the frog's digestive system were visible. This included the stomach, three-part liver, small intestine, large intestine, pancreas, and gallbladder. When the groups saw those gallbladders, they observed that they looked like "deflated peas." This added lots of humor to the lab.
 |
This page talks about the digestion system of a frog. |
(continued....)As the students cut through the skin of the upper portion of the body, the heart, the lungs, and the esophagus became visible. If the students looked closely, they could see the arteries and the spleen. On the other hand, most of the frogs were females so students were able to identify the ovaries filled with eggs. The eggs were represented with black spheres. Basically, Day 1 of the frog dissection was represented by this:(below)
(Left)Male Frog(dissected)
-------------------------------------------------
(and)
(Right)-Female Frog(dissected)- The eggs are the black spheres....
Source:http://www.altoona.psu.edu/academics/www/mns/bioal/Frog/femaleanat.htmThe cited page above talks about the interior anatomy of a dissected female frog.Student Reactions to DAY 1:
Based on the observations of Group #1: To start off with, the smell of the frog was really strong. This affected how the people of the group were going to dissect.
EXTERIOR: It was discovered that the dorsal side of the frog was smooth and was full of spots. The feel of both the ventral and dorsal sides of the frog were both solid. When pinning down the arms of the frog, the students could feel the strong hands of the frog.
INTERIOR: On the inside, the digestion system was discovered. The students of the group seemed fascinated by the body parts. The body parts were easily identified by this group, even though many other groups were having trouble matching organs to the ones from the diagrams given by the teacher. Additionally, the students were encountered with so-called "fat bodies." These miniscule structures appeared as spaghetti-like material and they represented the fat inside the body. "Wow, those fat bodies really did look like parts of spaghetti." Also, when the frog was first cut open, a liquid started to roam around through the frog and the group was unsure of what it was. The juice gushing through the frog really bugged this specific group. The heart was found above the three-part liver and it was seen in the shape of a triangle. Group #1 had trouble identifying the heart because they assumed it to be red because of blood, but however it was a white color. Right behind this organ, the lungs appeared squashed and simply disgusting. Despite the few surprising organs and substances found in the frog, the group found the systems of the frog really intriguing. They believed it was a "learning experience."
Wednesday, December 14, 2011:
Day 2 - Summary and Connections to Human Body - Students gathered once again in their designated groups with their designated frog. Today, the groups were to cut out each individual part of the frog. They would think about the similarites between the frog and the human body.
This page talks about the human digestion process.
Frog Digestive System
Source: http://www.tutorvista.com/biology/frog-digestive-system-diagram
(This website talks about the anatomy of the frog digestive system..)
Frog Digestive System
Source: http://www.tutorvista.com/biology/frog-digestive-system-diagram
(This website talks about the anatomy of the frog digestive system..)
(Cloaca is the opening for urinary and reproductive tracts)
Similarities:- The digestive system of both the human body and the frog body have the same parts and functions.
- In the circulatory system for both the frog and human, there is a heart which has included a right atrium and a left atrium.
- For reproduction, both human females and frog females involve eggs.
- Both animals have fat bodies which are broken down by enzymes.
- Both animals have similar exterior parts. For example, hands, legs, a mouth, a tongue, etc...
More Multimedia: Virtual Lab- (To Help You Get A Better Understanding About The Frog Dissection)http://www.mhhe.com/biosci/genbio/virtual_labs/BL_16/BL_16.html
(explains dissection of frog)(steps)http://frog.edschool.virginia.edu/Frog2/Dissection/Setup/setup1.html
A Frog Dissection Game:AWESOME!!!! - http://www.surgery-games.org/43/Dissect-a-Frog.html
 |
| Froggy Animation |
Friday, December 2, 2011


Tuesday, November 8, 2011
"As The Stomach Churns" Lab Response
In science class on Monday and Tuesday, we did a lab to represent the digestion of proteins in the stomach. I found this two day experiment really interesting. To start off with, we were provided with four test tubes which were used to hold the substances that were to be used throughout the experiment. Some of the main materials used in the lab were water, diluted hydrochloric acid, pepsin, blue litmus paper, and white boiled egg. We were instructed to put three pieces of egg into each of the four test tubes. The egg pieces represented what was going to be broken down. After that, we distributed pepsin, hydrochloric acid, and water into the test tubes according to the directions given. Basically, our goal was to observe any reactions of the boiled egg and the litmus paper. We used clean stirrers to touch each of the four mixtures of the test tubes and then with pressure touched the four different pieces of litmus paper. We noticed that test tubes with hydrochloric acid made a greater impact to the litmus paper. The acid made the blue litmus paper pink. However, the more watery substances didn't influence a color change of the litmus paper. From Day 1 to Day 2, there had been major differences in the solutions of the test tubes. For example, on Day 2 some of the test tube solutions were more mushy, sticky, and "bubbly" than the previous day. "Bubbly" refers to "with bubbles." Also, on Day 2 the egg pieces appeared smaller, because of it shrinking over the 24 hour period. A cool discovery I made was that pepsin and hydrochloric acid together would be best at digesting an item. Not pepsin alone, but with the hydrochloric acid, the two would have a strong ability to digest protein. The purpose of the lab was to connect real life science to what is occurring inside our stomachs. My group concluded that it takes time for the stomach to digest and disintegrate food particles. Similarly, it took time for reactions to take place in the experiment. The reactions were more clear on Day 2.
Subscribe to:
Posts (Atom)